Most Common Editing Corrections
Part One of a Three Part Series
Have you ever seen an amazing sports photo that just stopped you in your tracks? I mean a really cool shot where the framing is perfect, the colors are vibrant and the image is tack sharp and think, “I never get photos like that”? It is not uncommon. We are used to seeing our own photos right after they come out of the camera. The framing might be OK but the colors are a bit wonky, not quite as sharp as you had hoped and the contrast is a little muddy. Well I am going to let you in on a little secret. Chances are that the amazing sports photo you saw started the same way. The only difference between your photo and the shot on the cover of Sports Illustrated is the work done in post-production.
Today I am launching into a three part series on the most common editing corrections. I mean the magic that goes into making a fantastic image. Now I am not talking about wild alterations such as changing a player’s jersey color or removing an athlete. I am referring to the improving of your existing image. In Part One, we are going to specifically look at Color Balance, Levels and Sharpening. To make these changes, you will need to transfer your image from the camera to your computer and then into a photo manipulation software program. For tips on finding the best photo editing software to fit your needs and budget, see my article on Photo Editing Programs.
Color Balance
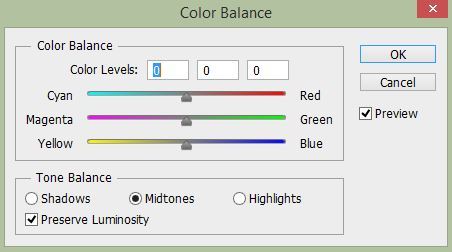
Light comes in a variety of colors and your camera doesn’t miss a thing. Even though we may walk into a lit gymnasium and just see light, our camera sees the colors in ways we may not like. Tungsten light tends to fall on the warmer side; think red or orange. Fluorescent or vapor lights might move to the cooler end of the spectrum (green or blue). Even when we walk outside we rarely see pure white light. In open shade or on an overcast day, the tone tends to be blue. At sunset, the light might be reddish. You have the option to shift that color tone in your photo editing software on your computer. All programs vary but you will most likely have the option to slide a color correction bar to bring the photo back to the tone you prefer. You may have taken an incredible photo on an overcast day which your camera will see as cold or on the bluish side. By sliding the bar up on the yellow or red scale, you will give it a more natural look. You may have captured an incredible basketball photo inside your local gym but the image might have an orange tone. Add more blue and tone down the reds and yellows. Each camera has its own quirks. Play around with this function to see if you can improve your photos.
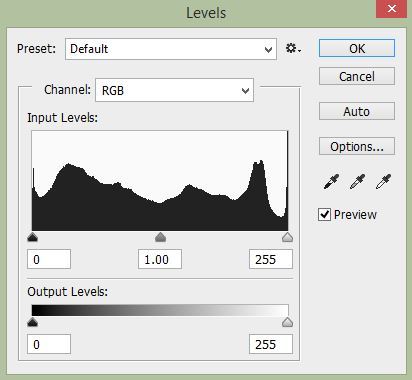 Levels
When you see the option for Level correction, what you will be altering is the whites, blacks and mid tones. Have you ever heard someone describe a photo as “muddy”? What they mean is that the whites are not white and the blacks are not black. There is a famous photographer by the name of Ansel Adams. I am sure you have seen his photos before. They are amazing black and white photos of Yosemite and nature. He would spend hours in the darkroom making one print. He was famous for finding incredible ranges of tone in all his prints. There was a pure white all the way through to a rich black. That is the sign of a great image. Same works for sports photographer. When you don’t have true whites and true blacks, your images will look “muddy”. With the Levels control you can individually control the white end of the spectrum and the black end of the spectrum. This sounds a lot more technical than it really is. Get in there and play around. You will see fantastic changes with a few small shifts.
Sharpening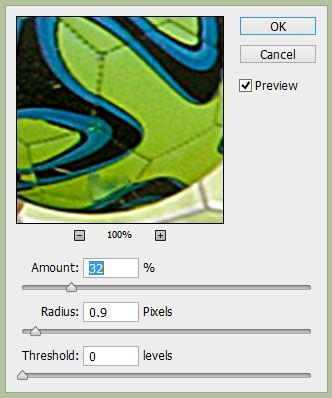
This one is pretty self-explanatory. You are correcting an image to add sharpness. You can change the parameters to ramp up the crispness of your image. Be careful with this one though. By over sharpening an image, you start to add funky grain and a strange unnatural look. If your photo is out of focus to begin with, you can help it, but you will never bring it back to complete sharpness without altering your image for the worse. However, if your photo is just slightly soft or it just needs a bump, using sharpening can give your photo that extra kick to make your photo pop.
By making a few of these changes you are on your way to creating an image you will want to print and frame…or at least post on your social media page!
Have a blast!

Scott Quintard is a professional photographer based in southern California and a 25 year sports photography veteran who specializes in teaching parents and aspiring photographers about how to capture sports imagery. Credits include 12 years as the official team photographer for the UCLA Bruins and a seasoned contributor for NFL Properties, MLB, NBA and NCAA. Scott is a husband and father of three young athletes. See more of Scott's offerings at www.sportspicpro.com.
NEW! Free Sports Organization Resources
All of TeamSnap's ebooks, articles, and stories in one place. Access Now
Similar Articles:
Most Common Editing Corrections - Part Three
Part Three of a Three Part Series Cropping One of the things…
Read More
Finding Your Inner Photo Editor
I don't know about you, but when I think of an editor,…
Read More
Most Common Editing Corrections
Part One of a Three Part Series Have you ever seen an amazing…
Read More